In the sub header on my blog I say that "nothing makes me happier than meaningfully and creatively connecting with others." I really mean it.
This post has two different parts...so be patient. And of course...jump ship at any time. I'm talking to you, Paul.
Paper Tube Connecting Part One

Mine is 13 inches long...hers is 18. Like mine...I used images from recycled art magazines giving it this watercolor artsy look.
It was fun for me that David was drawn to it in the first place...and it was even more fun secretly connecting with him about making one for Linda. And the best part is that I got to stop at their beach house to deliver it on my way to Maine today...and I got a tour of their amazing gardens.

Paper Tube Connecting Part Two
Just over a week ago I got an e-mail from Dale, a perfect stranger. The e-mail came at the perfect time for me personally....giving me a little boost. She had stumbled onto my blog during a google search....and liked what she saw....being especially drawn to the colors. She contacted me through the blogger contact form and asked for advice how to insert a little creativity into her life having recently retired. Needless to say I was thrilled! Long story short (which I hardly ever do)....we have been exchanging e-mails and brainstorming of how I might be able to help her. She was initially drawn to the paper tubes at the top of my blog so wants to give them a try.
I thought I would walk through my steps here on the blog....making it available to anyone else who might be interested. I am working on this post in Maine....and my supplies are in Lexington...so I may add a few more pictures once I am home. I sent Dale this online video because the process is similar...and there's nothing better than a video. The artist is making smaller paper beads for jewelry....but the process is similar so thought it might be helpful. Maybe someday I'll make my own video.


I roll the papers on a double pointed metal knitting needle (I'm not a knitter so don't know what they are called.) dabbing a little of my favorite glue on the end of the roll. Then I clip it with a clothes pin to dry....the tube fits perfectly into that groove on the clothes pin. I roll a tube at the other end of the knitting needle and by the time I do that...the first one is dry enough pull off and I move the clip. Then I just keep going and going and going....but I make them while I watch TV or listen to audio books so the time just flies.

I end up with this cool little pile of clippings....that yes, I have a hard time throwing away. These are from Linda's tubes...maybe I'll put them in a little jar for her...
I edge them all with a gold metallic paint pen....the kind you have to shake up. But a regular gold sharpie marker works too..it's just not as bright. The artist in the video uses paint...but I'm not very patient and the pens dry faster. This step is personal preference...but I really like the effect.

If you look closely....my glued edges are not always perfect....but that side get's glued down on a surface...so it doesn't matter. It would matter more if you were making jewelry.
And my gold edges are not perfect either....but sometimes I touch them up after they are glued down.
It's handmade...so it's OK to look handmade.
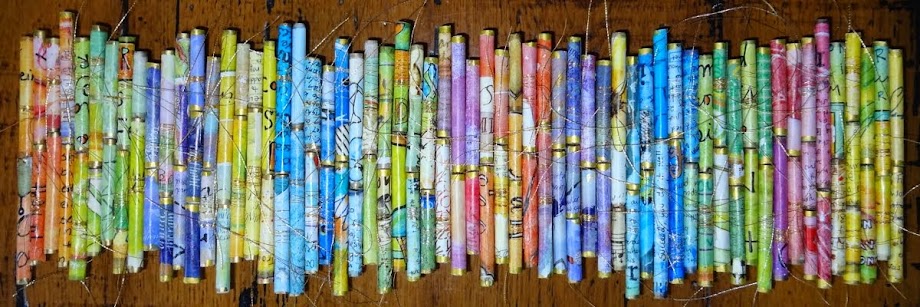
 I wrap about 1/2 of my of my tubes with gold thread (again, personal preference).....which I do right before glueing them down. I apply a little tacky glue to my board...wide enough for just a couple rows of beads. Then I randomly wrap the thread several times around...twist the ends up close to the tube. While holding the gold ends to the front...I lay it down in the glue seam side down. I used two tubes in each row...staggering the edges....and it's helpful to have the tubes different lengths. The tacky glue holds them firmly in place. This was actually Linda's that I had just started....but decided that I needed to cover the edges of the board...so scraped them off....decoupaged the edges of the board and started over. It was painful sacrificing these tubes...but it did show me how good the glue is. I had to destroy them to get them off. This was a commissioned piece...and I wanted it a little more "finished."
This is a bird's eye view of my work station....my dining room table in Maine....and I watched Netflix while I worked to pass the time. I actually find all the steps in the process very relaxing. These tubes take a lot of time...but I think there is a big payoff at the end.

The back....I actually like the uneven papers I wrapped around the edges. I left the wood exposed in the middle so Linda would have the option of using command picture hanging velcro strips to hang it... I thought they would stick better on the wood. But traditional picture hangers could easily be attached.

18 inches of paper tube goodness....
giving me the opportunity to creatively connect with others.

That is so cool to see your steps and work in progress! Thanks, I love it and totally get the idea now.
ReplyDeleteI think Linda loves it. Lucky her, what a nice husband. Dale
Glad this helps. Good luck!
DeleteSo fabulous MaryAnn. Love how the colors are so soft and flowing into each other. Adding the gold paint and threads is a great touch.
ReplyDeleteAnd the finished edges of the mounting board....superb!
Wow....thank you. I have been admiring your work for so long....so your kind words mean a lot. I'm so excited about the fusing class....more ways to play with color!
Delete