C

C

"I do believe in an everyday sort of magic...the inexplicable connectedness we sometimes experience with places, people, works of art and the like; the eerie appropriateness of moments of synchronicity; the whispered voice, the hidden presence, when we think we're alone." Charles de Lint

Thursday, July 21, 2016

Strings and Stripes

This is a side of a pyramid covered with spools of thread.

The video came across my Facebook feed a few days ago from The Artist Magazine and I thought it was fun.

Click here to watch the video.

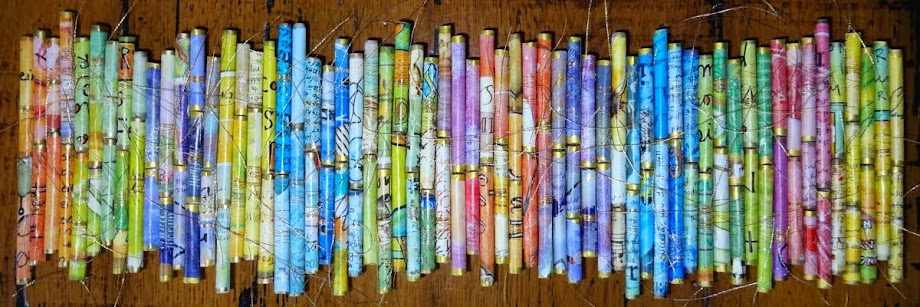


It goes well with this small rainbow fused piece I did for my class. I've had a hard time moving away from stripes....but I have played with a few other shapes. It will be interesting to see what we do with our "small works"....a new lesson comes out tomorrow.


Milestone

I reached a little milestone today.....a little over 20,000 views on my blog.  I can't quite wrap my head around it....but it makes me smile.  Thanks for checking it out!

Wednesday, July 20, 2016

"Creatively Connecting"

In the sub header on my blog I say that "nothing makes me happier than meaningfully and creatively connecting with others."  I really mean it.

This post has two different parts...so be patient. And of course...jump ship at any time. I'm talking to you, Paul.

Paper Tube Connecting Part One

Just today I delivered this paper tube art piece to Linda, one of my favorite people.  It was commissioned by her husband, David, (another one of my favorite people) who saw one hanging in my art show. He wanted Linda's to have similar colors....but he wanted it longer.

Mine is 13 inches long...hers is 18. Like mine...I used images from recycled art magazines giving it this watercolor artsy look.

It was fun for me that David was drawn to it in the first place...and it was even more fun secretly connecting with him about making one for Linda.  And the best part is that I got to stop at their beach house to deliver it on my way to Maine today...and I got a tour of their amazing gardens.

Paper Tube Connecting Part Two

Just over a week ago I got an e-mail from Dale, a perfect stranger. The e-mail came at the perfect time for me personally....giving me a little boost.  She had stumbled onto my blog during a google search....and liked what she saw....being especially drawn to the colors. She contacted me through the blogger contact form and asked for advice how to insert a little creativity into her life having recently retired. Needless to say I was thrilled! Long story short (which I hardly ever do)....we have been exchanging e-mails and brainstorming of how I might be able to help her. She was initially drawn to the paper tubes at the top of my blog so wants to give them a try.  

I thought I would walk through my steps here on the blog....making it available to anyone else who might be interested.  I am working on this post in Maine....and my supplies are in Lexington...so I may add a few more pictures once I am home.  I sent Dale this online video because the process is similar...and there's nothing better than a video. The artist is making smaller paper beads for jewelry....but the process is similar so thought it might be helpful.  Maybe someday I'll make my own video.

I start with scraps of magazine papers.  They are randomly cut...about 2 to 3 inches wide and 3 to 4 inches long. You just have to experiment with the paper size based on the paper you are using. You want them to be strong enough to hold up. I trim the tubes up after I roll them....so I don't worry about the edges being straight at this point.


I roll the papers on a double pointed metal knitting needle (I'm not a knitter so don't know what they are called.) dabbing a little of my favorite glue on the end of the roll.  Then I clip it with a clothes pin to dry....the tube fits perfectly into that groove on the clothes pin. I roll a tube at the other end of the knitting needle and by the time I do that...the first one is dry enough pull off and I move the clip. Then I just keep going and going and going....but I make them while I watch TV or listen to audio books so the time just flies.

Next I quickly go through all the tubes and trim the edges.  I don't always roll straight...and my paper is sometimes crooked...but I like a nice clean edge. I've tried to roll perfectly...but I just can't. Once in a while I have to insert the knitting needle again if the end gets flattened while I cut to pop it back out.

I end up with this cool little pile of clippings....that yes, I have a hard time throwing away. These are from Linda's tubes...maybe I'll put them in a little jar for her...


I edge them all with a gold metallic paint pen....the kind you have to shake up.  But a regular gold sharpie marker works too..it's just not as bright. The artist in the video uses paint...but I'm not very patient and the pens dry faster. This step is personal preference...but I really like the effect.


If you look closely....my glued edges are not always perfect....but that side get's glued down on a surface...so it doesn't matter. It would matter more if you were making jewelry.

And my gold edges are not perfect either....but sometimes I touch them up after they are glued down.

It's handmade...so it's OK to look handmade.


I wrap about 1/2 of my of my tubes with gold thread (again, personal preference).....which I do right before glueing them down. I apply a little tacky glue to my board...wide enough for just a couple rows of beads.  Then I randomly wrap the thread several times around...twist the ends up close to the tube. While holding the gold ends to the front...I lay it down in the glue seam side down.  I used two tubes in each row...staggering the edges....and it's helpful to have the tubes different lengths. The tacky glue holds them firmly in place. This was actually Linda's that I had just started....but decided that I needed to cover the edges of the board...so scraped them off....decoupaged the edges of the board and started over. It was painful sacrificing these tubes...but it did show me how good the glue is. I had to destroy them to get them off. This was a commissioned piece...and I wanted it a little more "finished."


This is a bird's eye view of my work station....my dining room table in Maine....and I watched Netflix while I worked to pass the time.  I actually find all the steps in the process very relaxing.  These tubes take a lot of time...but I think there is a big payoff at the end.


The back....I actually like the uneven papers I wrapped around the edges.  I left the wood exposed in the middle so Linda would have the option of using command picture hanging velcro strips to hang it... I thought they would stick better on the wood.  But traditional picture hangers could easily be attached. 


18 inches of paper tube goodness....
giving me the opportunity to creatively connect with others.


Tuesday, July 19, 2016

"Pedaling....

....Towards the Future: An Illustrated Lecture and Bicycle Tour"  

A mom's gotta' brag!

This is an upcoming event planned and executed by my son Sam.  It's being sponsored by Maine Historical Society, Greater Portland Landmarks, and the Bike Coalition of Maine.  


The flyer looks like it should be a page in the recent Ethan Allen catalog don't you think?

Way to go Sam!  I can't wait!


Monday, July 18, 2016

Could I be....

....more excited about the colors in the new Ethan Allen catalog? 

I think not. I see some punching in my future.


I did this quick digital collage of snippets from some of the pages....I do love the blues...especially indigo and navy. And per usual...the catalog is full of wonderful textures. 

Sunday, July 17, 2016

Stripes

Our task this week for the fusing class is to work with shapes...circles, triangles, squares, swirls etc....today I worked with stripes. We are creating "small works" that we will use in later projects. It's like we are creating our own patterned fabric pieces. You can see how Melody used her striped "small works" in this piece.  It's called "blueberry hill" and can be found here on her website in her street series. 
All the fabric I am cutting has Wonder-Under on the back....making it ready to fuse to another piece of fabric.

I cut this piece of indigo into thin strips using my rotary cutter. I didn't want the strips to be perfect...so I didn't use my ruler....I cut them free hand.

Then I started fusing them onto a piece of purple....
which just means I attached them using a hot dry iron. The purple 
also has fusible on back...so I needed to work on a piece of the paper 
backing so it wouldn't stick to my ironing board. 


For these two below I cut the strips on the bias so I could iron them down with a little curve.


Saturday, July 16, 2016

"Focus on Fusing"

One of the things I know about myself is that a little structure is good for me.  Not too much....but just enough to motivate me....especially when I think I'm too busy....and so far this summer has been busy.  

So I signed up for a free online class with Melody Johnson...a fabric fusing artist that I have admired for a long time.  

"I choose to fuse so I can be expressive with fabric in ways that would be impossible with any other construction method."


Melody is know for her color and patterns. She has a signature style and I can recognize her quilts anywhere. You can check out her website here and I have her pinned all over my quilt Pinterest boards.

These are a couple of my favorites...I love the transitions of color in both....and the little pops of prints in the one below.
I have done a fair amount of fusing....and I often mix it in with machine piecing. Joan and I used it to blend colors in this quilt for the welcome wall at church....and in this banner. But I would like to take it to another level...so here I go.

Wile I was in Maine this weekend I started my prep for the class....ironing Wonder-Under to a bunch of hand dyed fabrics. I think I'm going to need a lot more colors...but this is a start.

Melody recommends hand dyed fabrics because they don't have any chemicals in them...so they fuse really well requiring no quilting or top stitching if you don't want to. She recommends "Wonder Under" which I have used many times....and I just purchased a whole bolt.


Wonder-Under has paper on one side that you iron onto the back of your fabric.   


I trimmed it all up and pealed off the paper revealing the other side of the fusible webbing...which now can be cut and fused to other fabrics.  The first lesson was posted yesterday....and we have a week to work on it.  So stay tuned to see what comes next.  This is going to be fun.

Friday, July 15, 2016

Flowers on the Farm

I was excited to be in Wisconsin for the start of the sunflower explosion at Tim and LaVonn's farm. (my sister and brother-in-law)  They live on a busy road so hundreds of cars a day get to enjoy the splash of color in the old cow yard.

The sky was so blue and the clouds were just right....it was beautiful.  In a few weeks it will be spectacular!

Here is my post from last year when they were a little further along.


And....I got to see the "mother" plants of my rain lilies lining her front steps. She has lots of buds coming.

Thursday, July 14, 2016

Begin Again

I have packed a lot into this "pause"....not all of it easy.  But I have missed the blog....so I will just begin again.  In some ways I never stopped. I saw color and inspiration everywhere I went...and I ended almost every day being grateful for things that bring me joy.

We'll see where I go from here...but for now I will just begin again.


I just got back from a week in Wisconsin visiting family and friends. I stayed with my childhood friend Becky who knows me very well. This bouquet from her garden was by my bed along with a stack of magazines and this basket of goodies to play with. Like I said...she knows me well.

Thanks Becky!


Friday, July 1, 2016

Time to Pause

I have said this before...but I'll say it again....this blog has been one of the best things I have done for myself. I have ended almost every single day for a full year and a half sharing what I'm working on or a little something that brings me joy.

But I'm taking a little break. There are things that need my attention...voices in my head telling me to take a breath and pause.  I'm certain I'll be back....I have a lot more joyful puttering to do.

I couldn't think of a more appropriate picture to leave here for a little while than the six new rain lily blooms on my front stoop.


Be Kind

Wednesday, June 29, 2016

Hancock Grill

Every Wednesday night all summer long someone in our church hosts a backyard "Hancock Grill." Paul and I kicked the season off tonight...

 ............and had 45 people in our back yard.  People bring something to grill and a dish to pass...we had a feast!  It was a big success.


Tuesday, June 28, 2016

Performance Art

My adorable grand niece Vanessa....I think I would call this "performance art." It doesn't get any cuter than this!

Photos courtesy of her mom Kay's Facebook page.


Monday, June 27, 2016

Catalog Mosaics

Ever since I made the photo mosaic mirror (which sold in just a few hours) I knew I wanted to try it again using other materials. So one of the evenings I was sitting in Maine visiting with my guests I punched up an entire Ethan Allen catalog. And...just in case you were wondering...my guests didn't think that was weird at all. My husband is used to it...Ellen totally gets it....and Phil just goes with the flow.  
I have a whole stack of these catalogs...the colors are earthy and rich, and there are lots of interesting textures and lines.


The next day I edged some of the squares with a gray sharpie and glued them down in a staggered pattern on a gray piece of card stock. I left a little of the gray card stock showing because I wanted it to look like grout. I covered one 8 1/2 by 11 page of squares just to try it out.


Once it was good and dry I started re-punching.


These are some of the re-punched squares...they aren't glued down...but laying on top of another piece of gray card-stock. Once I rework the rest of the squares I'll find some sort of a frame or canvas and create a piece of art. I think there's potential here....I love using recycled materials! I think from a distance it will look like really interesting tile work....maybe.