C

C

"I do believe in an everyday sort of magic...the inexplicable connectedness we sometimes experience with places, people, works of art and the like; the eerie appropriateness of moments of synchronicity; the whispered voice, the hidden presence, when we think we're alone." Charles de Lint

Showing posts with label paper tubes. Show all posts

Monday, October 20, 2025

Reconnection

I reconnected with an art friend today...and it put a bounce in my step.

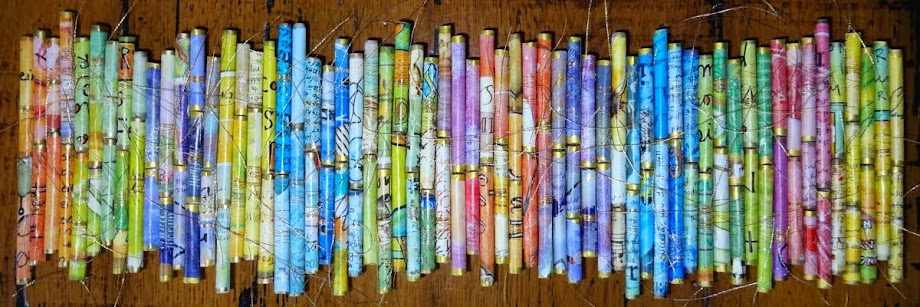
Some of you may remember that a year or so ago I had several art sessions/classes with Sally and Ida here at the condo. We did all kinds of fun things including gel printing and collage....and I loved every minute. Ida also came a couple times her own for a cyanotype lesson and help getting started on a rolled paper tube project like I have as the header of this blog. 

I so appreciated Ida and Sally's support and interest in my art....so when Ida chimned in that she loved my poppy project a few days ago....I knew immediately that I wanted to gift it to her.

So on my way to PT this morning I  reconnected with Ida....and handed off my Sticky Fingers poppy project.

It was so nice to see her again...and get a tour of all the beautiful artwork in her home. That piece in the background was done by her late husband Peter...who was quite talented. 
The colors were so rich and fabulous...I thought it was absolutely stunning.


Peter also painted the three iconic fishing shacks that were at the end of Willard Beach in South Portland...not far from where we had a little weekend home for several years. I remember them well.


They dated back to the late 1800s and survived countless storms until they were swallowed up by the sea in a massive storm in January of 2024. They were the subject of photographers and artists....and are dearly missed.

Photo found here.

And lo and behold...there underneath the fishing shack painting was a little bit of my art.

One of my tiny tree projects that I had forgotten that I gifted to Ida during a class. Gifting artwork brings me such joy.


There was interesting art all over Ida's house done by her...or family members including grandchildren. 

And one of the things that caught my eye in her dining room was her paper tube project. She had sent me a photograph...but it was so nice to see it in person hanging in her home.

It was a such a joy to reconnect with Ida. And that bounce in my step took me right to my studio! It's time to reconnect with my own art! 

Saturday, August 3, 2024

Done Me Proud!

"You don't need to be perfect to inspire others. Let people get inspired by how you deal with your imperfection."  Yes!

It's hard to adequately express how excited I was to get a photo of Ida's finished paper tube piece...and she's already started a second one! The jewel tones are wonderful as is the flow and rhythm. And I love that subtle and swoopy fiber dancing through the piece.

Well done Ida...you've done me proud! Ida started this project back in May during one of our art sessions.  


Tuesday, May 21, 2024

Creative Catch UP

I'm playing a little creative catch up today. I've been preoccupied with gardens, tulips and shadows...but there has been so much more I've wanted to share!

Like this beautiful fused glass piece that Tracie made for her daughter.  

It hangs by Ariel's front door and is an alternative to a hanging flower basket.  I think it's just fabulous! Well done Tracie!

Tracie gave me this delightful little fused piece for my birthday and I'm enjoying it in my kitchen window next to a larger fused piece. Along with a glass mosaic piece from my sister Nancy it makes for a pretty happy window!

And Susan shared these delightful little charms she made with paper tubes, wire and beads.  Aren't they fun! 

I also started a little creative catch up in my studio. I have four projects I need to work on before anything else...and I started all four today! That feels good! 

I have two orders for scrappy trees and I did the hard part today....fusing the striped fabric to the edges of the foam core. They will be very similar to this tree: https://joyfulputtering.blogspot.com/2023/11/indigo-blues.html and are for the same person. Now it's time for the fun part! 

Wednesday, May 15, 2024

Paper Tubes: More Projects

Subtitle: Catches My Eye

I love spring! There is so much happening all at the same time....and there's always something that catches my eye. Or several somethings usually!

Like this field of Cuckooflower that looked like a fairyland.  I was drawn right in...and was totally smitten!

As a matter of fact my plant app said Cuckooflower is sacred to fairies and it's bad luck to bring inside.

Paper Tubes: More Projects

I got to thinking about Melodie's idea of using straws for paper tubes. I had these fabulous red and white paper straws....but they ended up being too heavy duty and too difficult to cut. My hands can't do that that anymore. There will be a use for them someday....maybe actually as just a straw!

But I also had these plastic straws on hand too...so they ended being the winner.


I'm pretty happy with the way I roll magazine papers on knitting needles. So I got to thinking what papers won't be strong enough on their own that would benefit from the stability of the staw.  Deli paper gelli prints!  So using a little white glue and some torn pieces of deli prints I did a quick collage on the straw. They cut very easily....but they would also be pretty cool just left long!

I liked the way the torn edges looked...and wrapping it a little wonky was the way to go. They certainly have a more artsy look...I kind of like them and will have to try a few more.

There are all kinds of ways you can use paper tues. You can see my process for covering a frame for a mirror in this post:  

https://joyfulputtering.blogspot.com/2016/03/on-roll.html


And here's how I finished the edge of the indigo mirror:
https://joyfulputtering.blogspot.com/2016/03/the-edge.html


And this was a challenge I did with my sister Marilyn where all we could use were the reply cards that you find in magazines....and of course scissors and glue. The tubes became the frame.

https://joyfulputtering.blogspot.com/2015/02/reply-cards.html

It's kind of silly...but it's dimensional! As if that makes it not silly?


And here I framed a card for Janice.

The possibilities are endless for paper tubes!

This will be the last post about tubes....for now. I'd be happy to help anyone who needs more information...I'm just an email away! 

Tuesday, May 14, 2024

Paper Tubes: Part Four

Subtitle: The Easy Part

Once you start looking for shadows....all you see are shadows. 

And Paul doesn't seem to mind pausing to pose....or waiting patiently while I take a little video or collect photos.

Finding shadows is going to be the easy part.  Turning them into an interesting project for the class will be my creative challenge this week. But I have some ideas and Philippa gave us some great jumping off points.


Paper Tubes: Part Four

I wanted mention that Melodie contacted me and said she wraps her paper tubes around a straw and just cuts right through the straw. They would certainly be more study! I've heard of doing that with fabric too...something I've wanted to try. hmmmmm

I'm not working on a paper tube project right now...so I will share photos from previous projects for the next steps I do. And if I end up helping Ida through her process.....I will share photos when the time is right. Or she will share her photos with me I'm sure.

I do like to add a little gold thread. Again....that's the way I was taught and I like the wild whimsy that it adds. I know it's not for everyone!  
For the long art pieces I use a piece of thin board I pick up in scrap bins at a lumber yard. It might be lattice...but I'm not sure.  I like pieces that are 2 1/2 to 3 inches wide and 13 to 15 inches long. 

I use some sort of tacky white glue to adhere them to the board and just work on an inch at a time.  

I don't wrap thread on every tube...just a few here and there. After I put down my glue on the board I wrap some thread around a tube and set it in the glue SEAM SIDE DOWN holding the threads to the top.  The glue holds the threads in place. I used to tie them...but that was ridiculous! 

I often have a general plan...like you see here. But I also just wing it sometimes.  I almost always stack two tubes end to end...I think it adds interest. 

I glue them in a staggered pattern making sure they hang off the edge. I often have to cut a few down or in half....and sometimes have to roll a few more to get the colors...rhythm and flow I'm looking for.  

Starting with a few commissions I started wrapping the edges of my boards with scrap papers using medium or any kind of glue.  

It just gives such a nice finish. 
Side view


My preference is to hang them with command velcro type picture hangers....
not the hanger you see here.

Saturday, May 11, 2024

Paper Tubes: Part Two

Subtitle: Pickled Vegetables

The theme this week for the Conscious Creativity class has been Using Our Senses.  Philippa let us know that this would mostly be an in the moment awareness experience...and a bit hard to capture into a tangible class project. My days this week have been enriched by being aware using all my senses....and Philippa gave us plenty of ideas to help us along. 

I have fiddled with several possible projects....but I abandoned most of them and latched on to a couple late in the week ideas that I'm now turing into my Instagram reel.  Today's part involved pickled vegetables.  

As part of my health journey...I'm eating lots of pickled vegetable.  No sugar....just vinegar, garlic, dill, spices and any vegetables I have on hand.  I fill this jar at least two times a week...and today I filmed and photographed the process and turned it into a sensory celebration.  

It really was crazy fun! It made me so aware of each step including the sounds on the cutting board and the distinctive smells of the spices and vinegar.  

I'll share more photos and a link to my final project once it's posted.


Paper Tubes Part Two: Rolling the Papers

I roll my tubes around a knitting needle....and size of the needle (and the length of your papers) determines the thickness of your tube. I roll it tightly and dab a little glue at the end to secure it.  

I have used various white glues...but I've discovered that a glue stick works pretty well because it grabs pretty quickly and less messy. I just swipe it along the back edge at the far end of the paper before I start  rolling. If I'm using white glue...I add the glue when I get to the end of the roll. You will find what works best for you.

I often use a couple small clothespins to hold it so I can quickly move onto the next tube. They only need to be on for a few seconds...then I just keep moving the clothespins to the next one and pull the tubes off as they dry.


It took just a few minutes to roll that little pile from yesterday's post.  

It's one of the mindfully mindless tasks I love so much....the perfect thing to do while I'm watching TV.

You never quite know how the pattern will land until you roll it....so there's kind of a little reveal moment at the end.  Remember what Ida said: It's so fun to see what you think is going to happen and it turns out totally different. Fun!  

Yup!


It's nearly impossible to roll them perfectly....so I trim all the ends. The tube flattens out when you cut them...but you can just pinch it right back out or insert the knitting needle again if you need to. I often do this as I go along...or just have a cutting session. These days I do have to be careful of repetitive hand projects....those darn thumbs of mine!


You end up with all these fun little clippings that there must be a use for.  

This is a pile from another project...and I wouldn't be surprised if I still have them. They actually would be quite pretty in a jar.  


These photos are from a commission project I did years ago for my friend Linda.


I find it helpful to lay the tubes out so I can access my colors as I go. You can see that I do like to stack two next to each other....I think it adds to the interest. Seeing this makes me want to make another one...I think they are scrumptious!

Friday, May 10, 2024

Paper Tubes: Part One

There is so much spring happening out there...I can hardly keep up. Today I'm celebrating white....so fresh and clean. 

We continue to have cool days and nights...which the spring blooms really like. And even though I'm still wearing earmuffs and gloves on our early morning walks...I'm loving every spring minute.

We saw our first hummingbird yesterday, and we have 8 ducklings on the pond.  


Part One: Choosing Papers

I can't write about paper tubes without giving a shout out to Ellen...an artist I admire who taught me so much fabulous art stuff while I lived in Madison. She's done all kinds of recycled paper projects including paper beads and tubes and she shared many of her techniques with me.

I have a trivet in my kitchen that Ellen made out of recycled paper where she tightly wrapped coils....another take on the same concept.  


And...I can't help but share this photo from Becker Middle School.

I saw this photo years and years ago and it is what inspired me to do my pieces in a more rhythmic and staggered style like the header on my blog. 

The first step making paper tubes is to choose and cut up papers. 

I've mostly used recycled magazines and catalogs...and a lot of my images come from art and craft magazines which gives them a certain look. I like a variety...some with words, different shades and tones, and some patterns and neutrals.  Anything goes really. Often times one catalog will have a certain color scheme so it all coordinates.
Any lightweight paper would work.....just find some you love....and a scheme and rhythm will appear. Magazine papers might seem a little thin...but you'll be surprised how strong they are when they are rolled. Thick paper would be hard to roll.

The cuts don't have to be perfect...there is a trimming step that takes care of that.  It's good idea if they are all about the same length so when rolled the tubes are similar thickness...but the width doesn't matter.  

Mine are about 3 to 1/2 inches long...and I like a variety of widths. Ida is making most of hers wide...but she can make final decisions during her project design phase. Once they're rolled...you can always cut them to any length you want.
I remember making beads like this way back when.  

You start this type with a triangle....but for the art pieces I like to make.....I like the uniform tubes.


So in the tube style....the ONLY part that shows is the very edge of the paper along the end of the roll.  So don't waste a beautiful image inside of the roll.

Cut your paper so you take advantage of that and have the parts that you don't like so much rolled up inside.

This post has already gotten pretty long....so tomorrow we'll start rolling and trimming.